

Introduction
Tron legacy was a Disney film released in
2010 as a sequel
to the classic original 1982 film that was a pioneer in computer
generated
graphics and visual effects. The film reprised key elements from the
original
including the iconic light cycle races and the glowing lines of light
of the
costumes.
I have mixed feelings about the film, as
many do; it is
visually stunning. The light suits and lightcycles in particular are in
my
opinion up there with the very best film costumes and vehicles of all
time. The
soundtrack by Daft Punk is fantastic and fits with the visuals
seamlessly.
Unfortunately I was left feeling somewhat disappointed that the story
doesn't
fully match up to the visuals.
Whilst much of the film is CGI, there are
significant, and important
elements that weren't, and having an interest in practical effects,
these
really appeal to me. Key sets were built fully practical, and
incorporated the
iconic lighting (End of the Line Club, Flynn's arcade etc.), and
importantly
the light suits and other costumes were completely practical. I was
therefore
inspired to try and create a real, practical light suit myself, and so
embarked
on the significant task of working out how...
I started my costume build by deciding
that as others may be
interested, I wanted to be able to create more than one costume. I
therefore
decided to put effort into creating drawings, patterns and moulds to be
able to
produce multiples of parts. I also wanted to experiment with some
techniques
and materials not familiar to me, and this gave me a good opportunity.
My vision for the costume is not to
produce something fully
screen accurate to the film, but neither to create something simple but
Tron
like. Rather I would make something that to a general observer looks
like the
film versions, but is of a far better quality than cheap Halloween
costumes, is
durable, and most importantly has real functioning lighting. It would
be very
difficult to replicate the cast foam latex method used in the films
without a serious
budget and a lot of time, and so I chose to use a laminated flexible
flat foam
method instead.
It has always been my desire to make the
costume fully lit,
not relying on retro-reflective tapes as others have done. I therefore
considered a wide range of options for lighting, but settled for the
more
expensive, but lower work option of using a kit of pre-cut
electroluminescent
shapes (from EL wire craft). This ties in with an easier ability to
make multiple
costumes.
The project started with an information
gathering stage-
there is a lot of information scattered around out there. My key
reference
sources are listed at the bottom of the page.
The second stage was to do design work
before starting
builds- this started with the identity disks.
I have primarily used Draft Sight software
for design, this
being a free CAD program similar to Autocad that I'm familiar with in
my day
job, allowing me to produce accurate dimensioned drawings and patterns.
Downloads of these drawings are available in PDF format for those
interested.
Identity Disk
The film is reported to have a number of
variants of disk (a),
but for ease of handling I chose to go with the more common 10" disk.
Many
earlier costumes have used the Disney deluxe toy disk, and modified it;
however
these are now becoming uncommon and expensive, so I took the decision
to make
my own mouldings.
I started with a picture of a disk sold at
auction, and
armed with the 10" outside dimension was able to scale from the part to
produce a drawing. It can be difficult to accurately scale from a
photo, but by
making a number of assumptions such as the dimensions will be fractions
of an
inch (as it is American built), and how big tooling is likely to be, I
was able
to come up with a design that looks close to the real item.
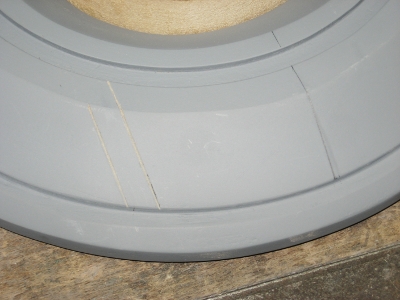
I made a few minor changes to the screen
part for the sake
of easier manufacturing (such as the angle of the light ring), but it
keeps the
general theme, and also ensures that the disk can be easily handled. I
am
familiar with woodwork and have a good range of tools that made making
the
pattern relatively simple, although I still had to buy a large 45
degree router
cutter- it will be easier to sculpt from clay if you don't have the
workshop
facilities.
The master disk was made from MDF- the
base shape was
finished in a couple of evenings' work (6-8 hours), but I then had to
spend a
much longer time (probably about 16-20 hours) on finishing the disk to
a level
at which it would be able to make a good mould. This included many
layers of
primer and paint, spot putty and a lot of careful sanding. I have since
learnt
of the trick of using superglue to seal MDF that may have saved quite a
lot of
time.
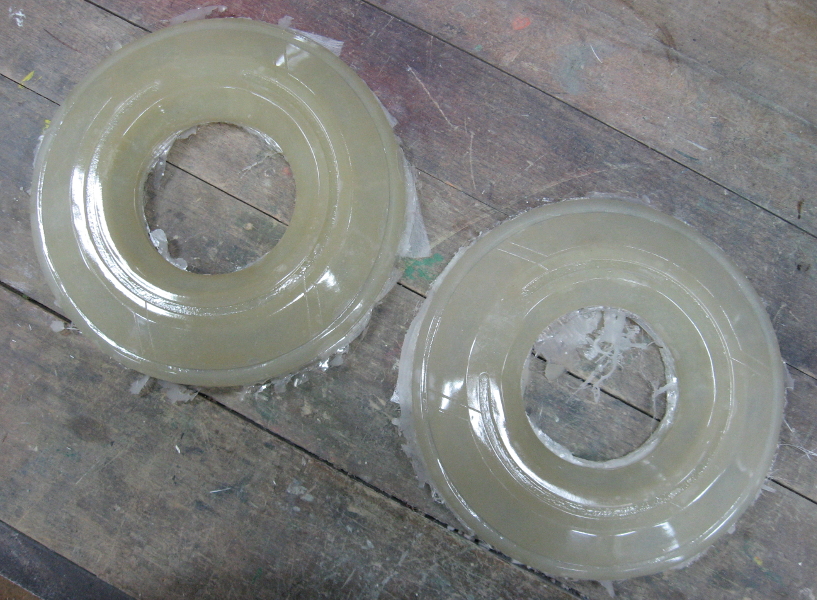
The mould was made using Mold Max 20
silicone from Smooth
on, and backed with plaster. Initially I cast the disks in
polyurethane, but
ended up choosing to change to GRP due to a number of challenges. The
first
polyurethane I picked (smooth-on task 15), ended up being too flexible
to make
a good joint between the two halves, and as I was brushing up and it
was low
viscosity, it ended up pooled in the bottom of the mould cutting down
my
internal space. The second version used Sika Bi-Resin, and worked much
better,
but still left me with a poor inner space to fit the inverter so after
discussion with a professional body caster at the Brighton Mini Maker
Faire, I
chose to change to Polyester based GRP, using material from South
Western
Industrial Plasters.
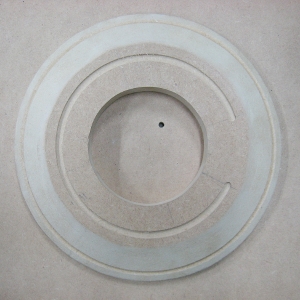
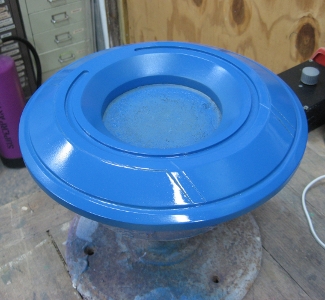
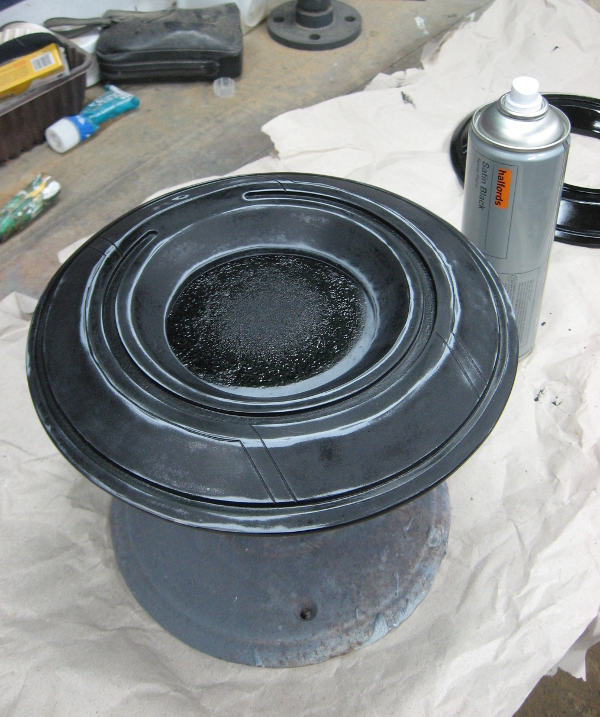
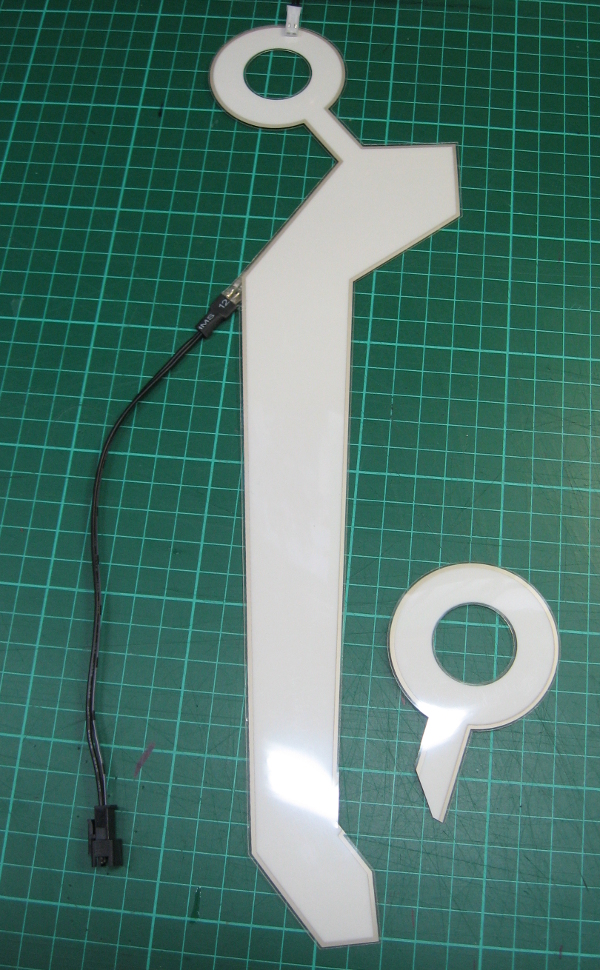
The illumination is by EL wire sunk into
the C ring and
glued in place. The inverter is inside the disk. This is a standard
inverter
with the case removed and the battery holder replaced with an AAA unit
to make
it fit. The on off button pokes through the disk and is un-obtrusive.
To
diffuse the light on the disk, I used clear silicone sealant mixed with
a small
amount of talc to make it more translucent than transparent. This
hasn't proven
very durable, so in future I would likely use polyurethane resin
instead.
The disk is held together with 4 small
screws. I haven't
made a lit outer ring yet, but may do so in the future when time
permits.
This project was my first using silicone moulds and polyurethane, so I have learnt a lot about the process and would make some changes if I were to do it again, although I was overall happy with the finished product.
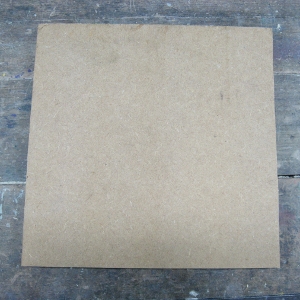
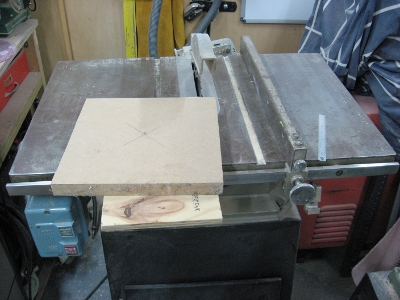
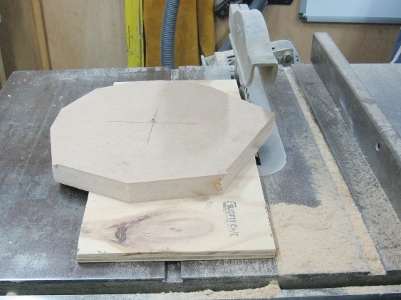
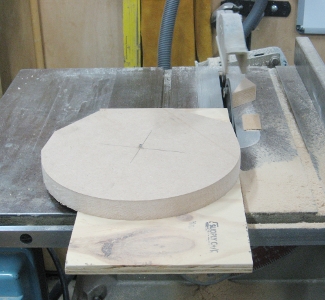
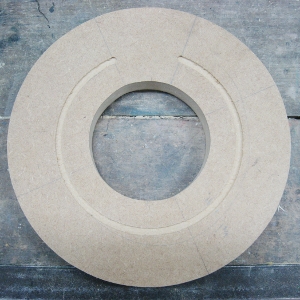
Identity Disk blank cut out on table saw from 18mm MDF
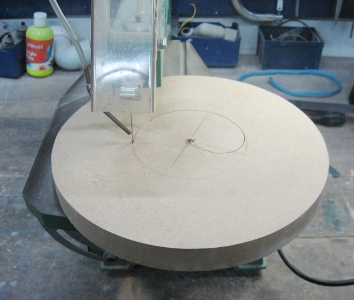
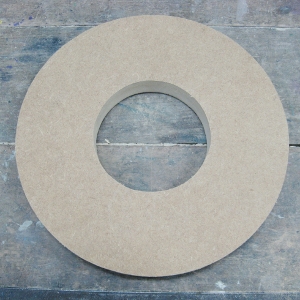
Inner hole cut with scroll saw and sanded
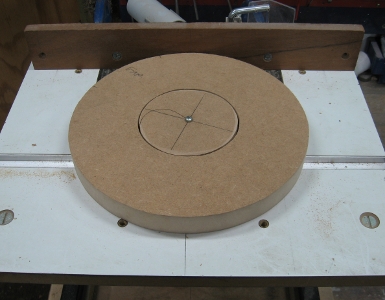
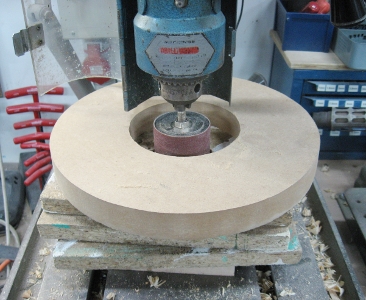
Lighting groove routed into the disk

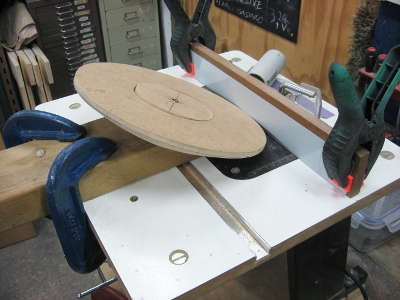
Outer edge angled and perimeter groove routed
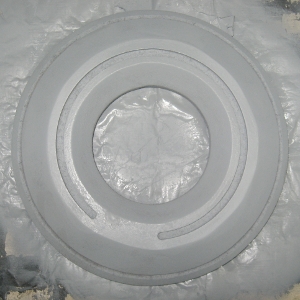
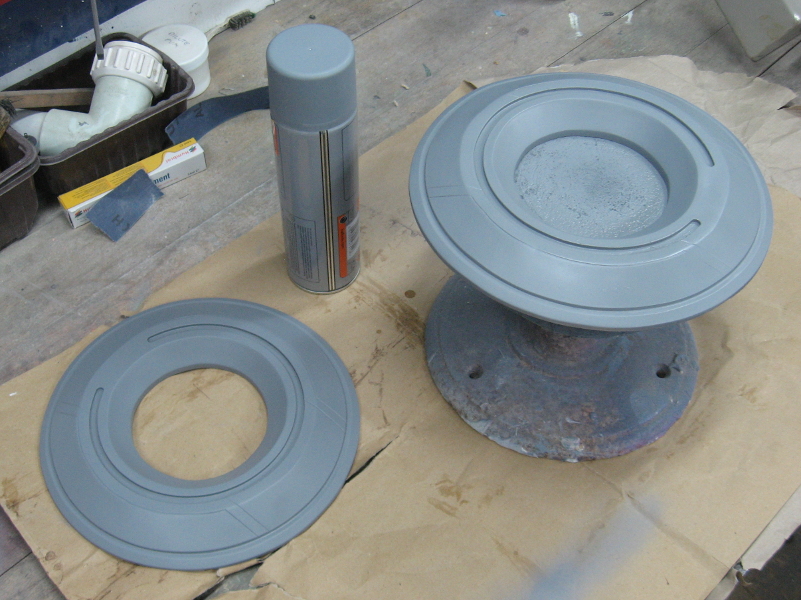
Details added, disk sanded and painted- many times
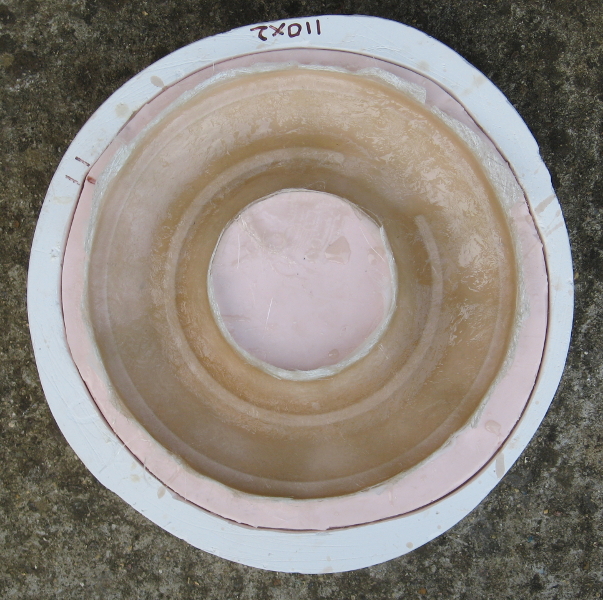
Silicone mould made, jacketed with plaster.
Glass Reinforced Polyester mouldings cast, trimmed and painted
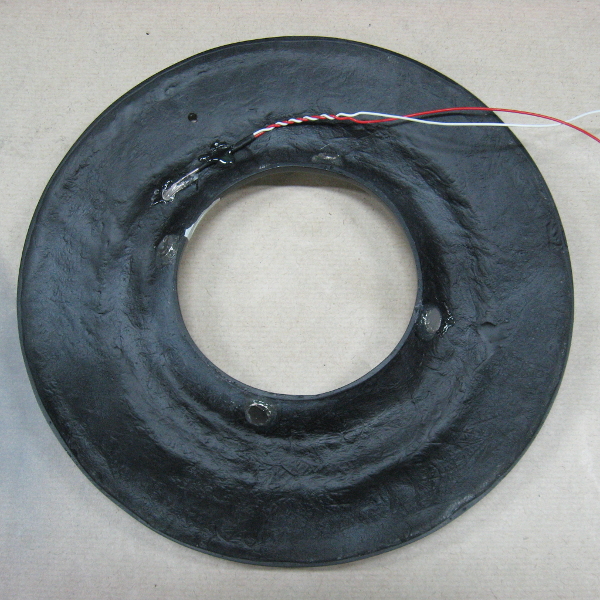
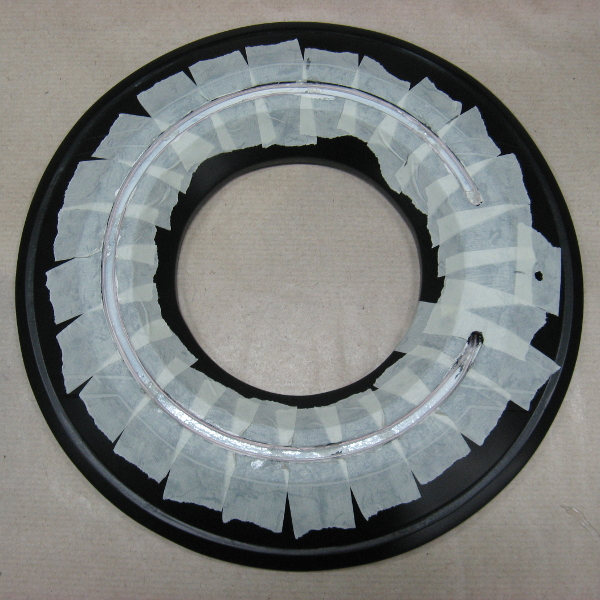
Painting finished, EL wire installed and transluscent infill added
Costume
I had chosen to use pre-existing EL tape
shapes, and so
tried basing the design off a number of still images from the film and
details
from the supplier. Unfortunately the EL shape drawings supplied were
scant of
information and distorted, so I had to wait until I took delivery of
actual
parts to measure and re-draw. These drawings are available as part of
my set.
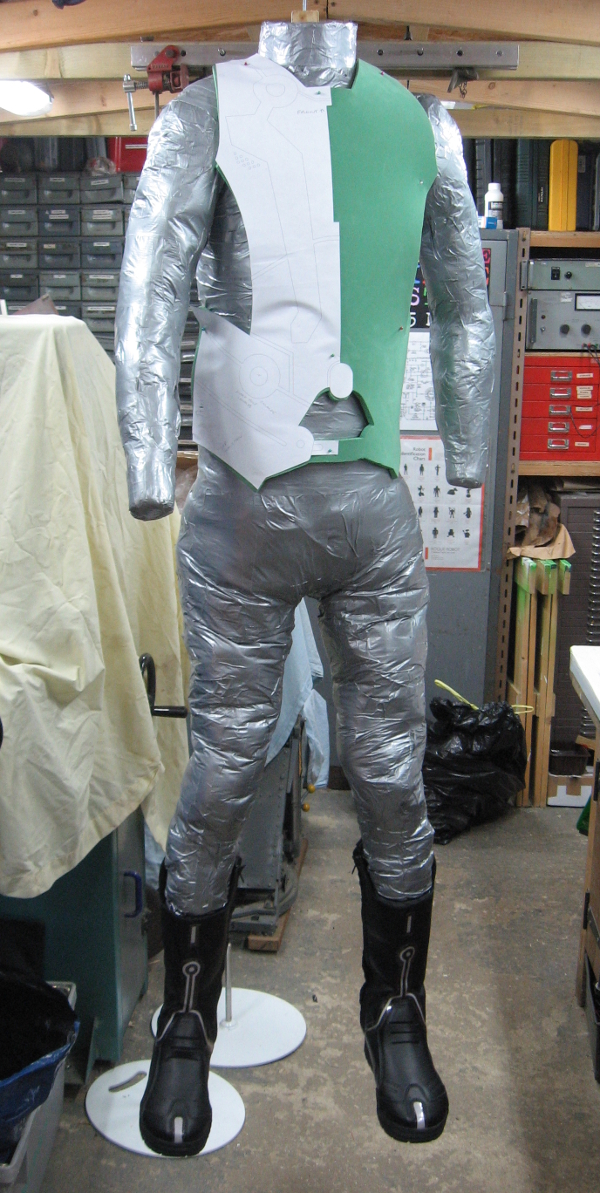
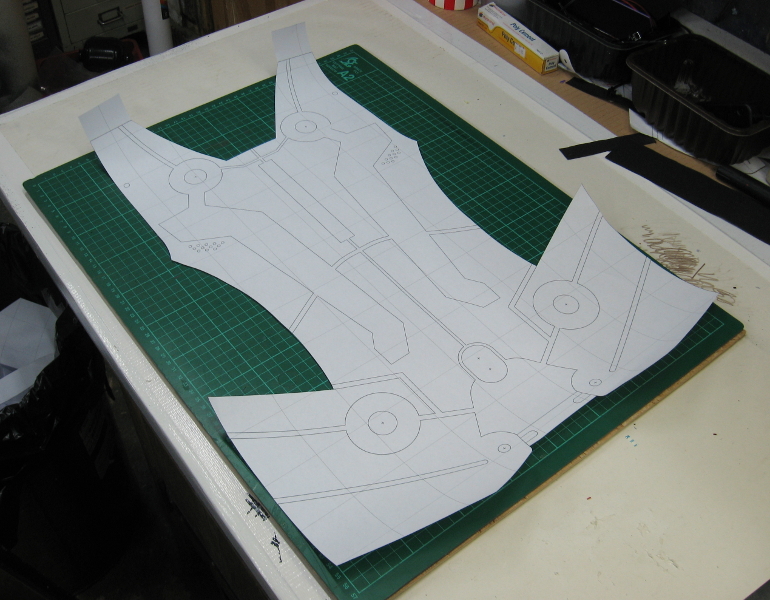
The costume design started by tracing drawings from film stills and production photos into 2D CAD. Unfortunately there aren't many good full view photos, so I have had had to piece together the design from many different images. Once traced in I overlaid the design with the EL shapes. Unfortunately there are quite a lot of differences in these to the film. I therefore had to create a hybrid design using elements of the production design where possible, the EL shapes where necessary and tweaking to suit my body shape with patterns on a duct tape dummy. This sounds simple but has been a long-winded process and in the end might not have been the most efficient method, although it does result in drawings others can use.
My wife helped me produce a duct tape dummy to use during
the build. There are plenty of tutorials out there that will give you a good
idea how to do this, however there are definitely a few key points I discovered
that you may find useful;
It is very difficult to get the dummy accurate without
distortion, both during the wrapping stage and the filling stage- you will need
to be very careful to produce the least distorted dummy possible.
You will need a LOT of stuffing. I cut up foam from old sofa
seat pads and scrap upholstery foam on the bandsaw into cubes of about30-40mm.
I got through over two dustbins full of it. Packing it in enough to give a firm
shape compressed it a lot.
I created a simple wooden skeleton that allowed me to either
hang the dummy from a screw eye at the neck or stand on some floor bases by
using a pin up through the heel. The ability to change between these methods
was useful. The skeleton was built with flexibility at the waist and ankles to
ease getting the costume on and off. No skeleton was fitted in the arms.
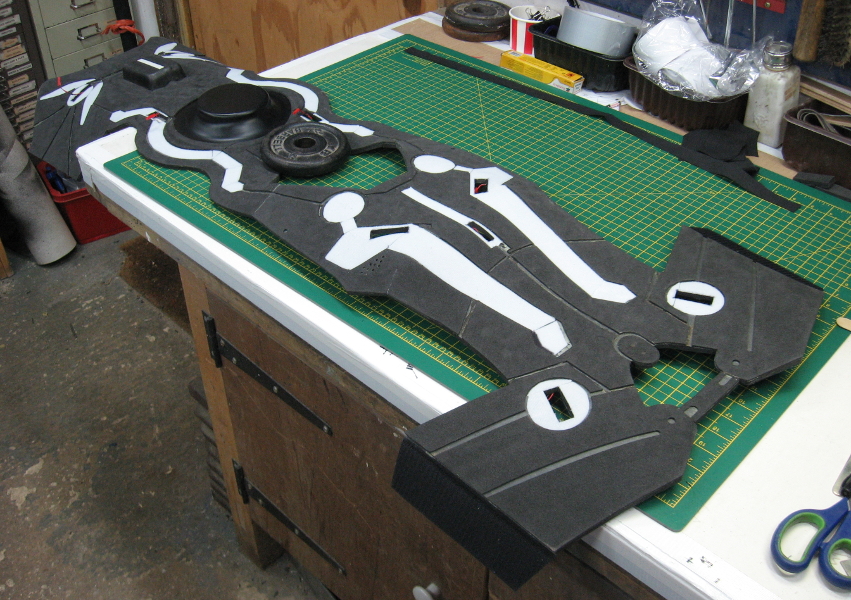
My construction concept was to use two
layers of flat sheets
of foam fitted over a matt cotton-lycra catsuit. I experimented with
using
silicone foam prior to settling on the more common closed cell
polyethylene:
Plastazote LD45 (see foam notes below). I felt that as the silicone is
more
flexible, and already has a semi-gloss surface finish it could
considerably cut
down on the amount of work needed. When samples arrived, I was
disappointed to
find the colour to be nowhere near black, being more of a mid-charcoal,
and the
cost to be impractical.
Plastazote may be a bit more expensive
than the commonly
used EVA foam and camp mats, however I take the view that one of the
key areas
of failure in a project can be materials. If I am carrying out a
project such
as this where I am making a significant investment in time, then I want
to be
sure that the materials used of a good quality and importantly
consistent. With
the Plastazote I am able to order to a defined specification, and to be
able to
order more material to that same spec at any time I need. In addition,
the
Plastazote tears significantly less easily than the thin EVA foam that
was
available, a distinct advantage, although the surface structure is
somewhat
more open. It is difficult to find consistent EVA foam in the UK in the
5-6mm
range I needed.
Before starting the build in earnest, and
as this was a new
type of project for me, I spent time gathering samples and carrying out
tests
of materials and techniques so that I could have confidence the final
project is
going to work and be durable. This included making a couple of foam
test pieces
and wearing them whilst working on other projects to ensure foam
durability,
adhesive bonding, wiring routing and EL tape mounting methods. Whilst
there is
much written on foam armour techniques, I have seen little on the method of foam directly
attached to an
undersuit, and my exact selection of materials differs from other
builders. I
would strongly suggest that anyone else working on this type of product
does
their own experimentation.
Bill Doran's (Punished Props) Foamsmith
(b) books and
Youtube channel are a good source of
starting info as is the RPF forums (a), Evil Ted's YouTube channel (c)
and
'Costumes and Chemistry' (d). If a project like this is your first I
strongly
recommend familiarising yourself with the techniques you can find on
these.
I chose to use hook and loop tape to
secure the EL wire to
the costume, however conventional Velcro and its generic equivalents
are quite
thick compared to the EL tape and foam thickness I wanted to use, so I
tried to
source 'low profile' types. These are available, but unfortunately not
in the
black I was hoping to use on the costume side, and the widths available
are
limited. Enquiries to a couple of manufacturers for retail availability
proved
fruitless, so I resorted to using a 50mm wide white system that was
available.
This has a mated thickness of approx. 2mm and so is fairly unobtrusive,
and I have
been impressed with the bonding ability of the adhesive.
Most of the established foam fabricated
costume sites are US
based and so recommend 'Barge Cement' as a suitable adhesive for
bonding foam
together. In the UK this is not widely available, so I chose to use
Evostik 528
as this is readily in reasonable size cans- I bought mine from the
local
builders merchant. It is also possible to get a thinner/ cleaner for it
which
can come in handy. So far it has proven to be a good choice.
The Evostik adhesive isn't suited for
bonding to the cotton
lycra, it tends to peel too easily. For these areas I used 3M 76 spray
adhesive. This is quite a lot more expensive but is much more
effective. As it
is a spray adhesive, parts not to be covered needed masking up with a
combination of cling film and masking tape.
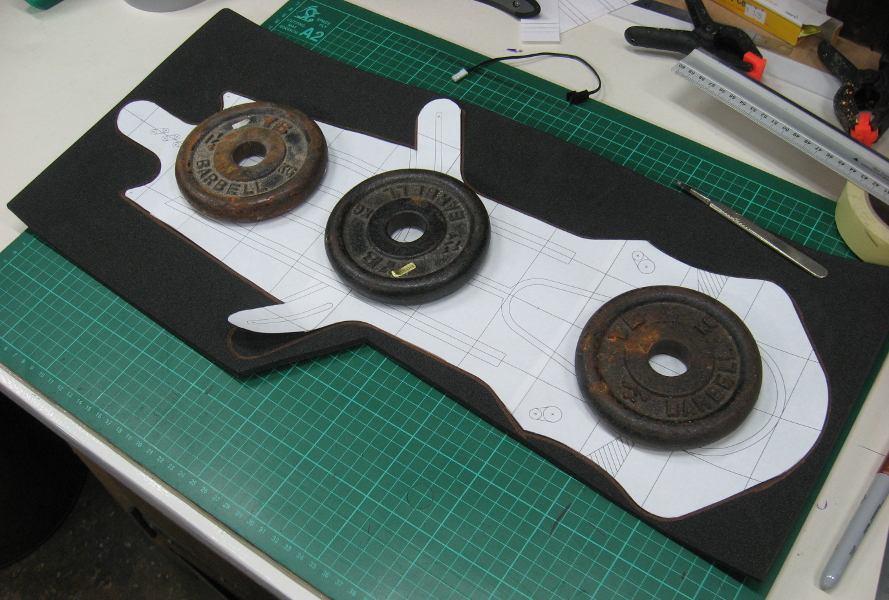
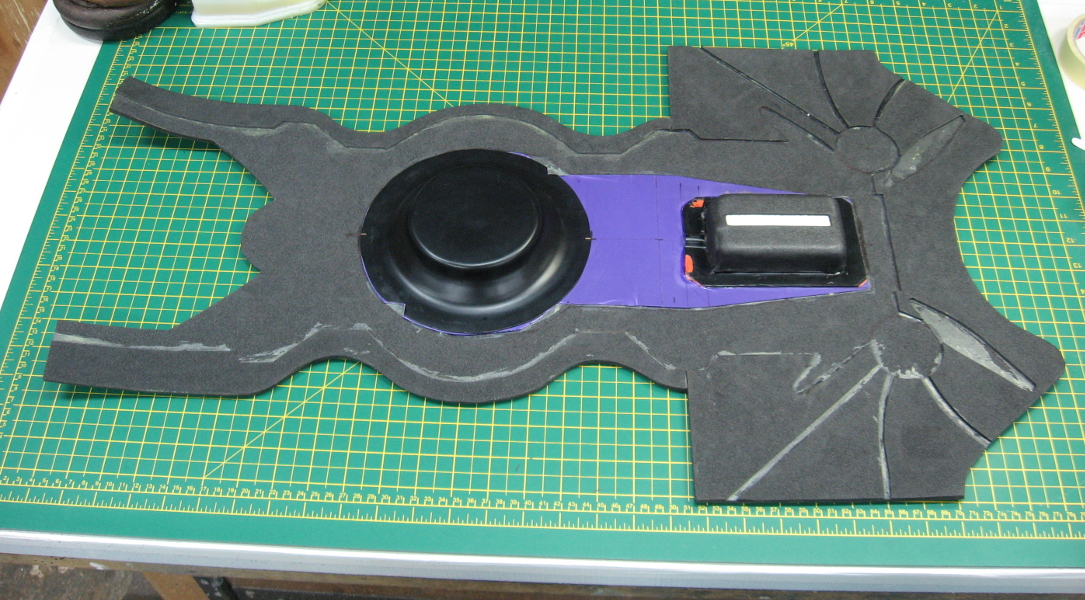
Once the planning was complete I had the
templates printed
at the local Staples and cut them out. These were transferred to the
foam and
this in turn cut out. The two layers of foam were then carefully
laminated
together.
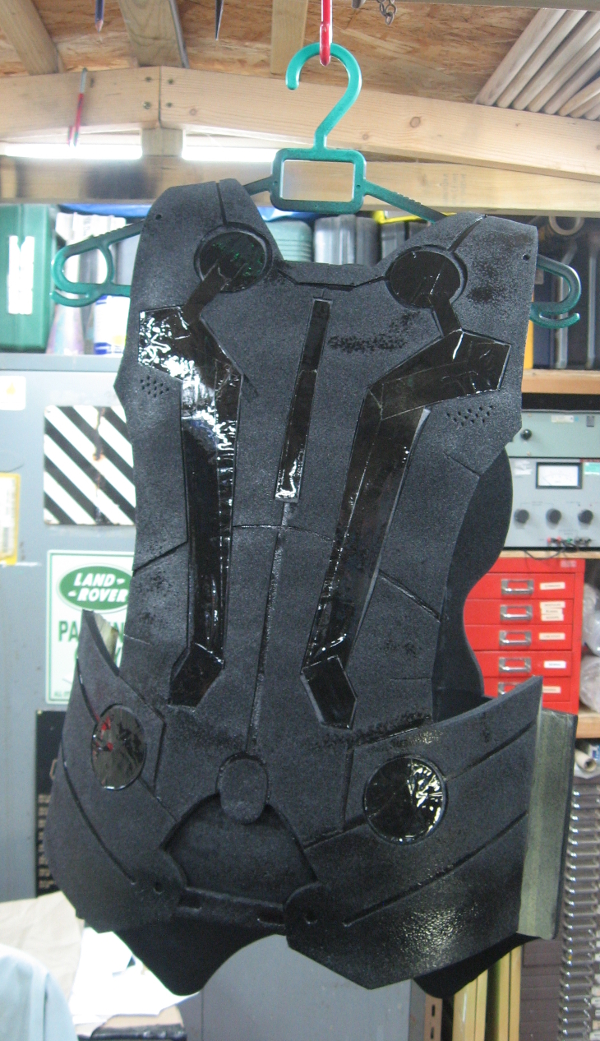
In areas where joins were made or, places
where I felt the
foam would not take the stress on its own I added reinforcement by
black
calico. This was particularly important round the base of the torso
section and
was used to attach the velcro needed around the waist.
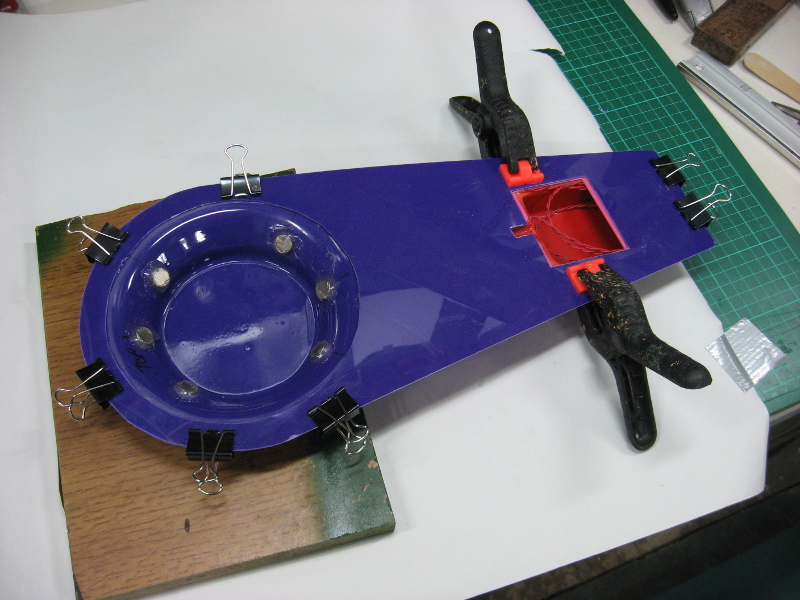
To secure the disk, I manufactured a
plastic moulding that
snugly fitted into the disk centre by making a wooden mould and vacuum
forming
HIPS sheet over it. The battery sits in a separate moulding made in the
same
way and the two are linked together by a sheet of HIPS. This is then
laminated
into the back of the costume.
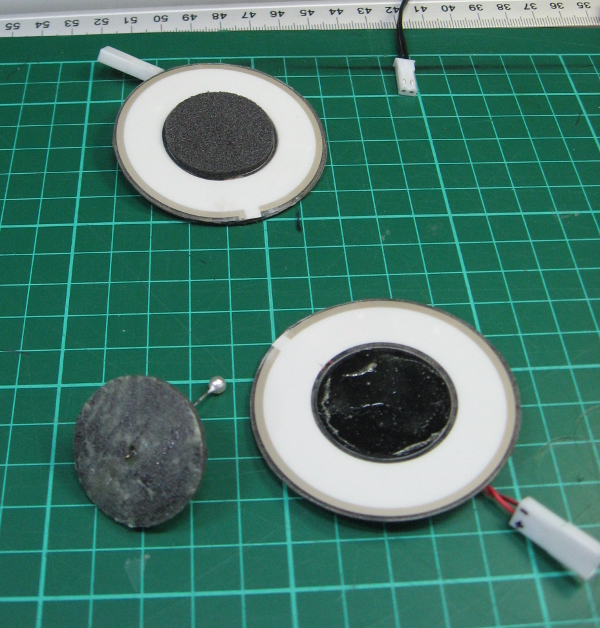
To mount the disk to the costume I
installed a number of
powerful magnets in both the disk and the moulding. This is sufficient
to hold
the disk, but easy enough to remove.
Velcro was added to secure the el panels
and the Velcro and
other areas masked prior to paint. For this I used 3 coats of
Plasti-dip black
which gives a nice matt black and evens out the finish.
The gloves were made from a pair of
neoprene diving gloves
with the fingers cut off and embellished with foam and then painted
with the
Plasti-dip.
Once assembled, parts that required it
were masked off and
the foam sprayed with three coats of black Plasti-dip giving a rubbery
and
durable matt black finish.
I contemplated doing an undersuit with the hex print, but in the end found the cost too high for this project- material alone would have been around £100. I therefore used a basic cotton-Lycra dance catsuit as the base. Changing to a printed undersuit, or stencilling on the pattern is possible as a future upgrade.
EL Lighting
The panels I bought came with a wiring harness, but I chose to redesign this to my own needs. Firstly the connectors used are 9mm thick, thicker than just about any other part of the costume and so would be difficult to conceal. The supplied harness was made with a lot of connectors as joints to connect sections together, again giving me more of a challenge to conceal. I therefore made a harness with splits spliced by soldering in unobtrusive places and insulated with heatshrink. I used a high spec PTFE insulated wire I happened to have a reel of to get the wire diameter down significantly and used JST RCY series connectors (part numbers below) from Farnell & RS to connect parts. These are 4mm thick- much easier to conceal! I used strips of calico to secure the wires in place.
The EL panels were paralleled up on the under-suit, with
some of the cabling run inside the catsuit and the remainder between the foam
and the suit. A connector was brought out to a point under the torso where a
connection could easily be made.
Where the EL panels had to be cut, this was done with a
sharp pair of scissors with superglue (Cyanoacrylate) applied to the cut edges
to seal them.
I have used the inverter supplied with the panel kit to drive the costume, and used a modified standard part for the disc, but have been a bit disappointed that there aren't many better options available on the market. When you open up the units they are not particularly well built, have tall transformers and are not very efficiently packaged, being made down to a price. I suspect there would be a market for better units at a modest cost that are more compact than the existing and offer options for external switching.
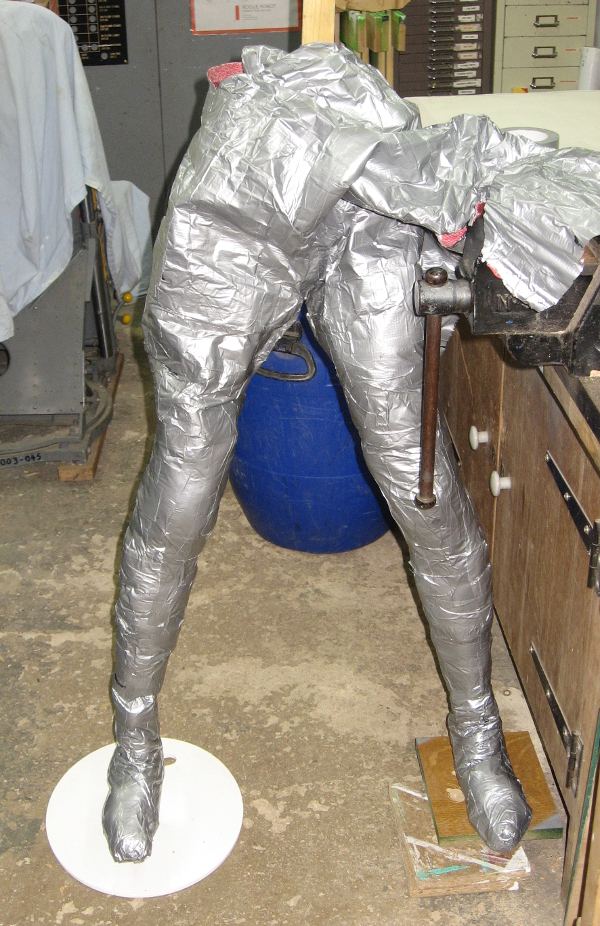
Duct Tape dummy in build and finished
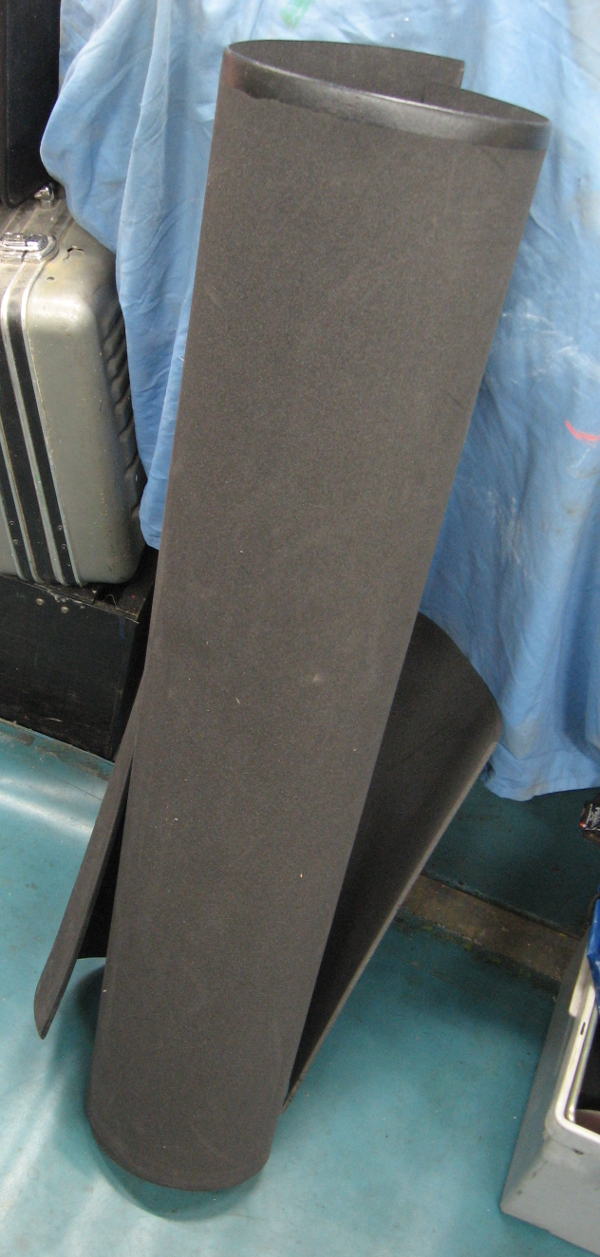
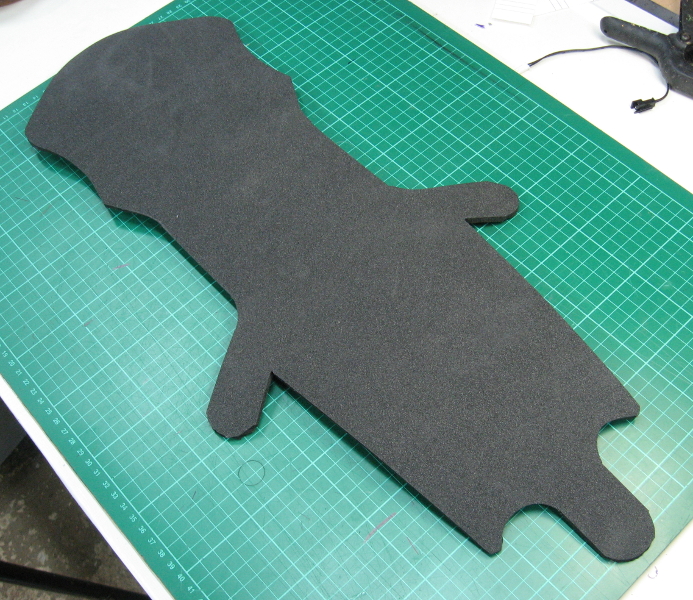
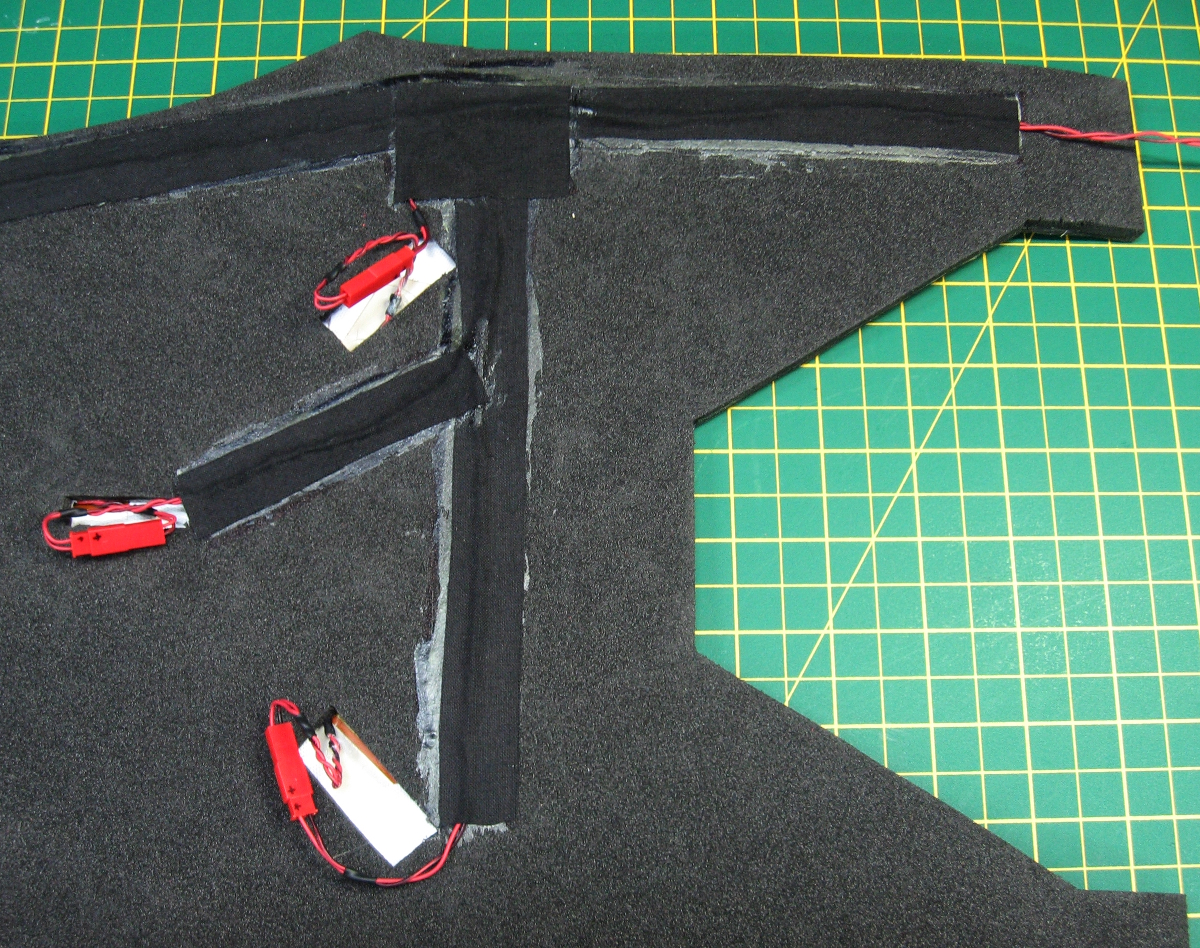
Raw plastazote, pattern cut and first layer of foam for arm pieces
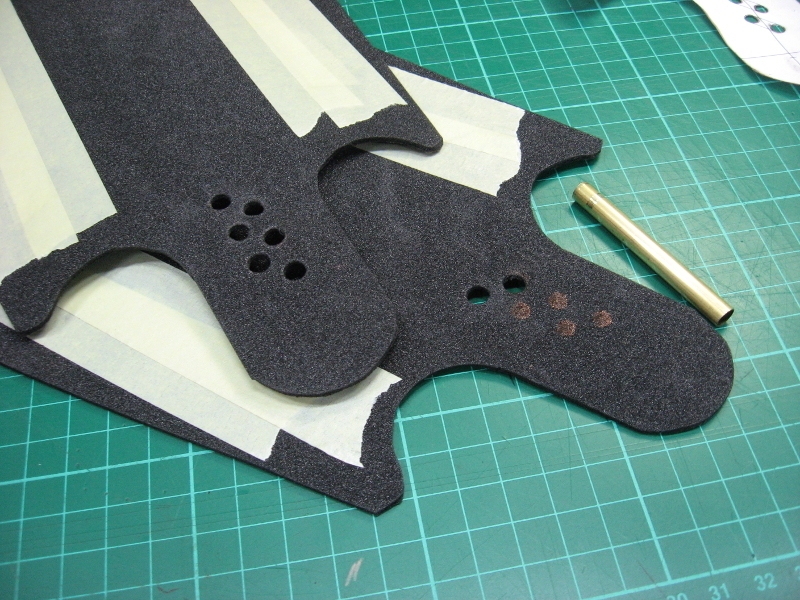
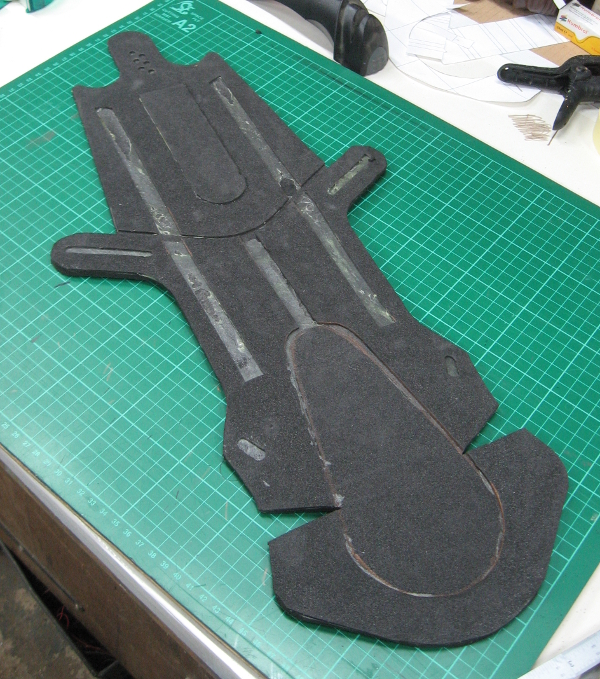
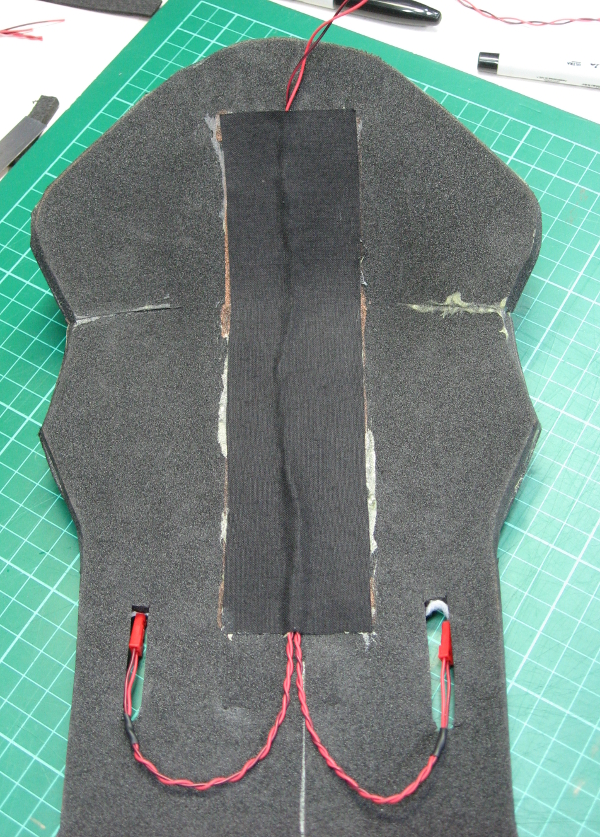
Holes punched and second foam layer laminated to base, wiring attached to rear
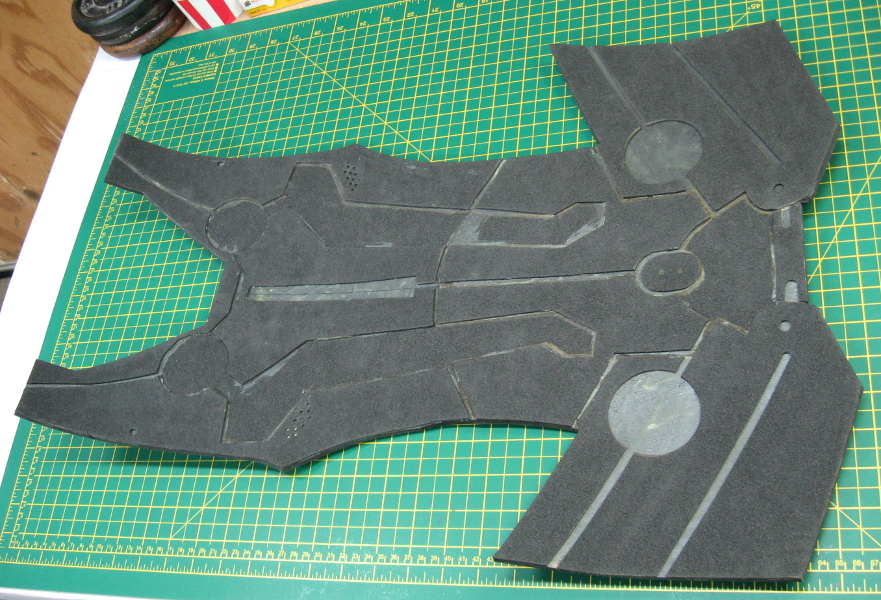
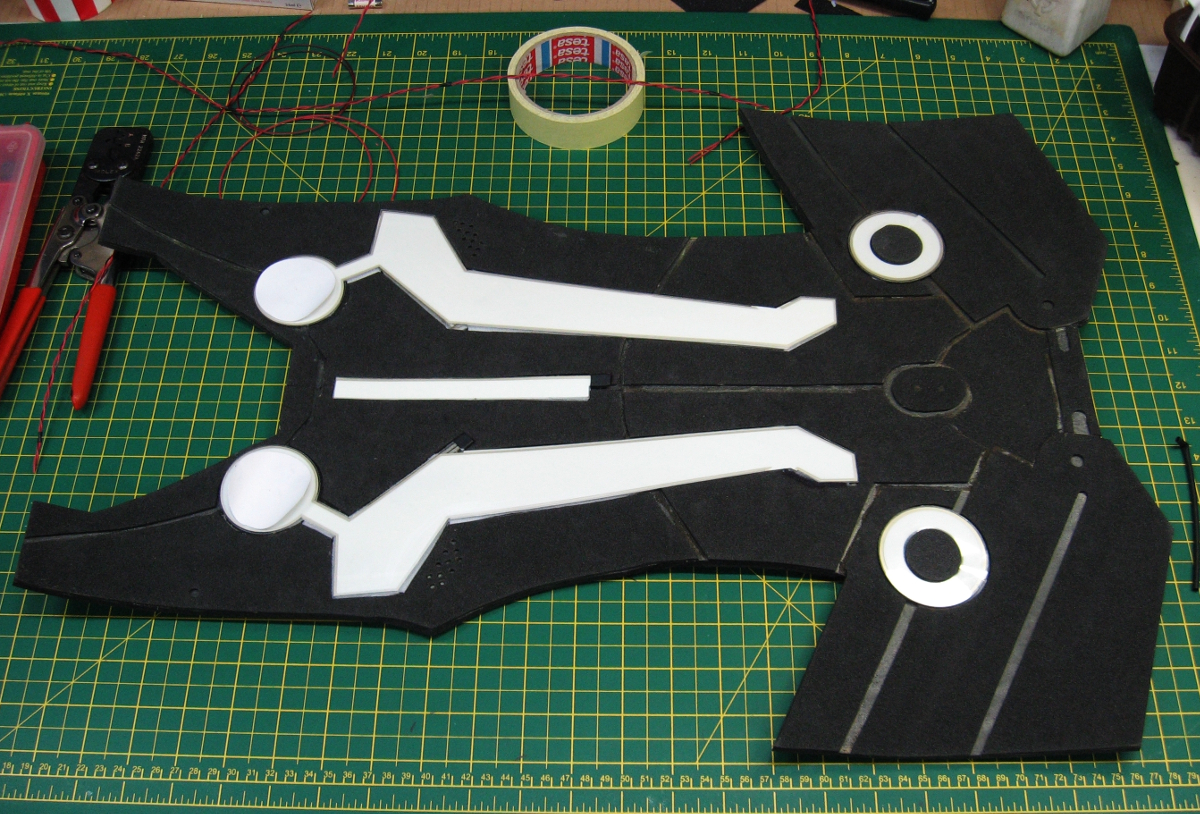
Torso Pattern and laminated torso front
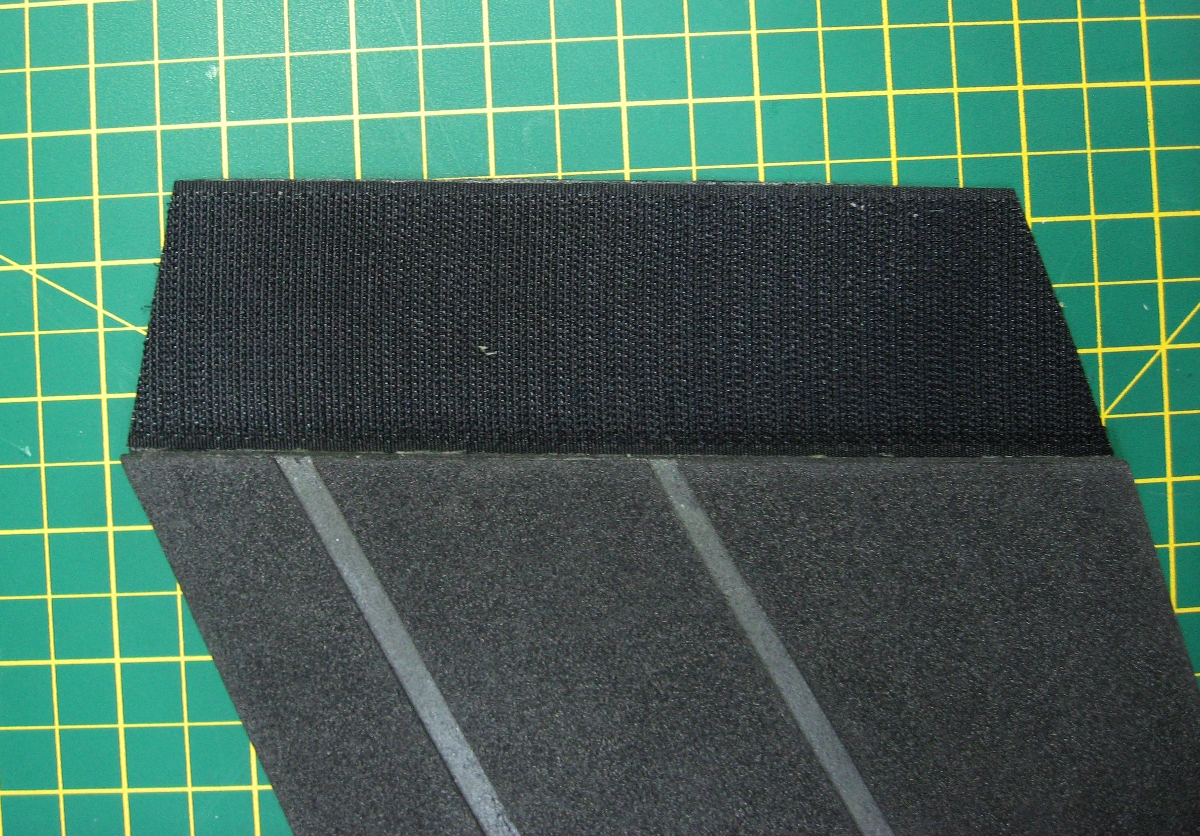
Velcro torso joint- reinforced behind with calico
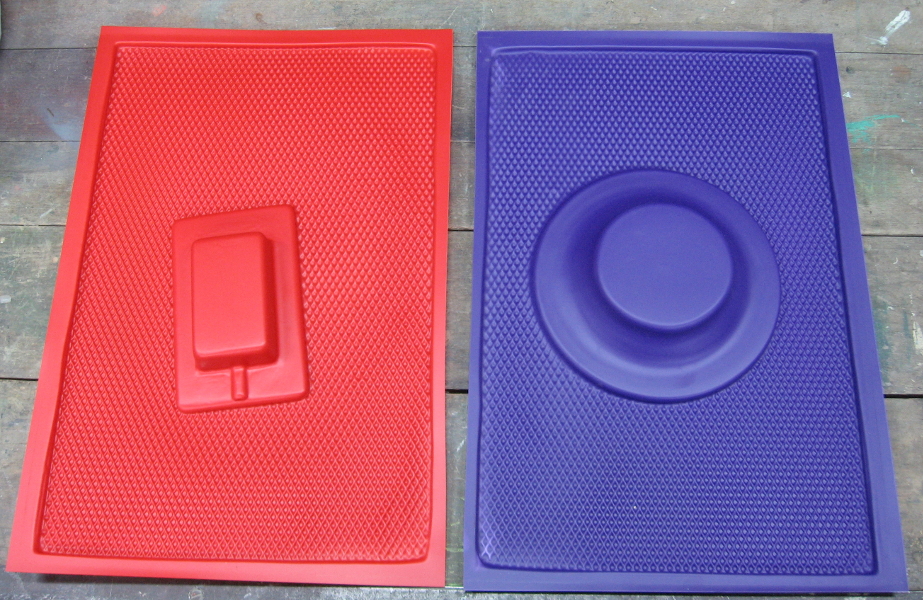

Identity Disk mount and battery nox as moulded on vacuum former and disk trimmed with magnets installed
Battery holder and Identity Disk mount joined with back plate and mounted to rear of torso
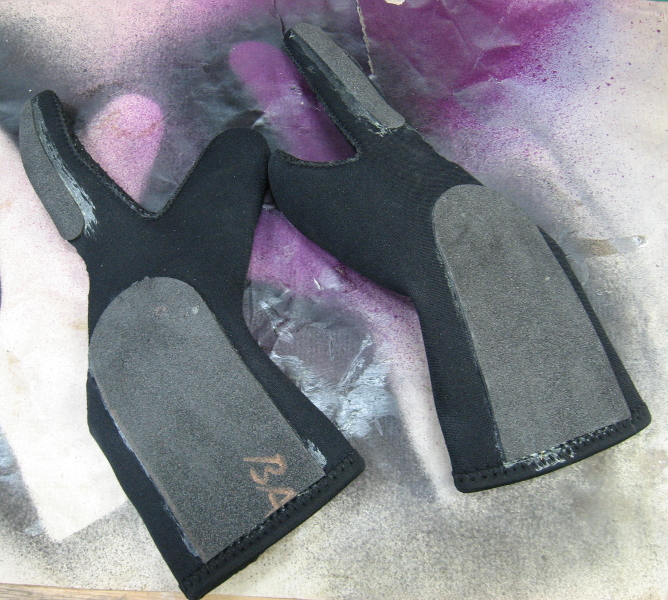
Gloves with fingers cut off and foam added
Hook and loop closure added to areas where EL panels to be fitted. Masked up and foam coated with Plasti Dip

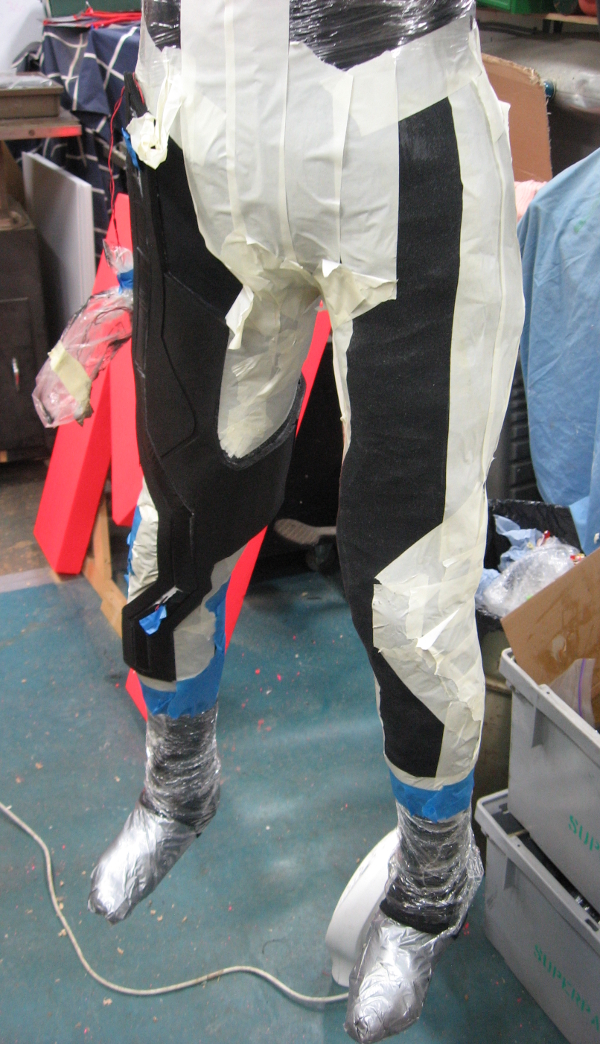
Undersuit masked and prepared with 3M 76 adhesive
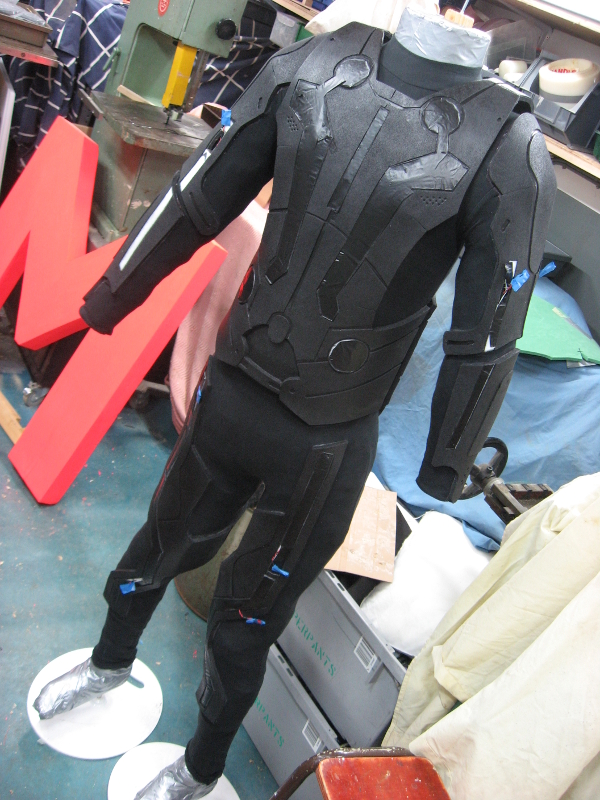
Suit with leg and arm pieces bonded to undersuit and torso trial fitted
Some EL panels needed trimming to better suit the costume. Others needed amendments such as foam in the centre.
All panels had new connectors fitted and thin loop bonded on for attaching to the costume
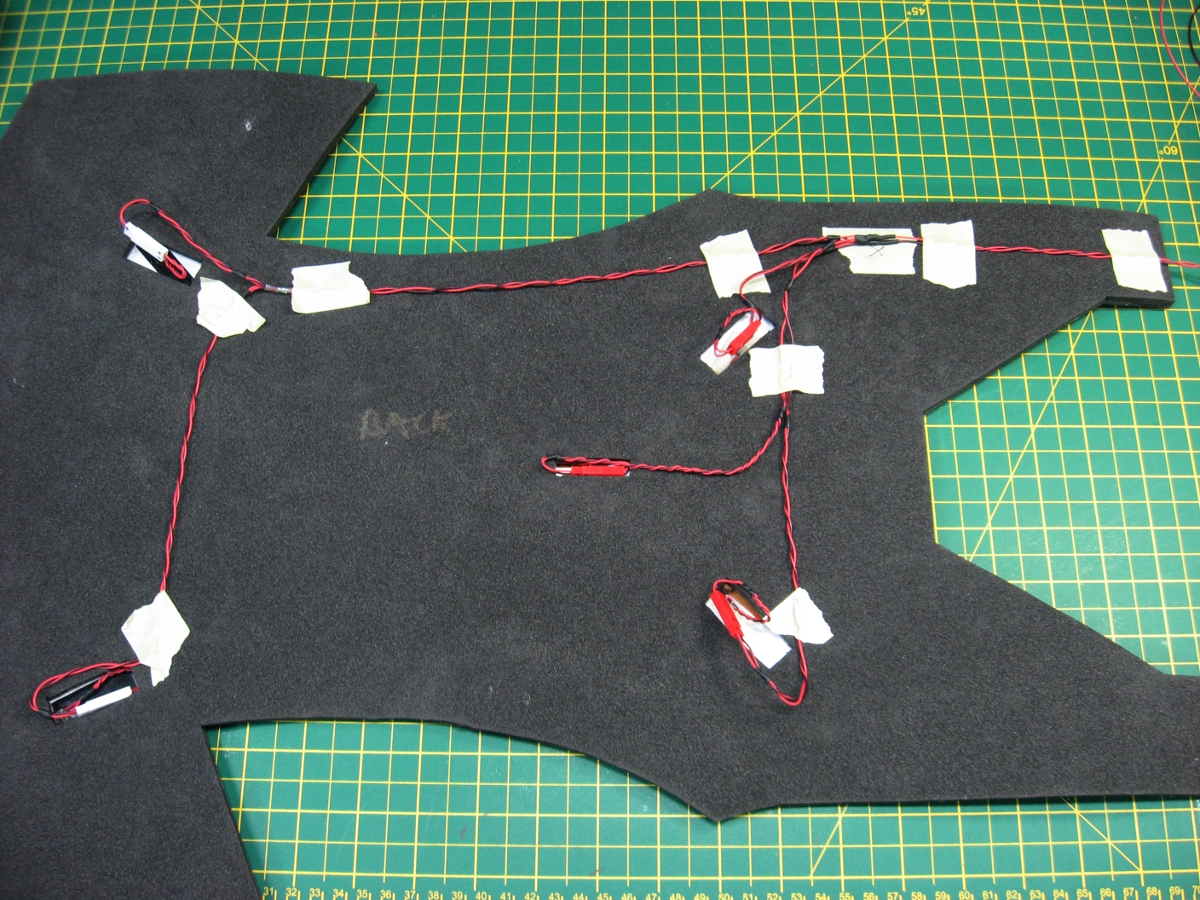
Wiring laid out temporartly and taped over with calico
Velcro attached to foam
Boots
I spent some time investigating
possibilities for the boots
(dance boots, fashion boots, boxers boots etc.) but didn't find
anything I was
truly happy with. I bought a pair of used motorbike boots of a style
not too dissimilar
to the film, but once I started experimenting with them I decided they
weren't
a particularly good option. The leather and lining together were fairly
thick,
but the boot was going to need covering with foam to give the right
shape to
accept the EL wire and doing this would end up with a very bulky
finished part.
As the boots are fairly stiff, and are designed to be worn with
leathers the
boot opening is largeand therefore didn't give me the look I wanted. I
started looking at other options, for which my favoured solution was
going to be
modifying a pair of cosplay superhero boots- they were much thinner and
fitted
the calf much better, but were still relatively expensive for something
to be
modified. At this point I by chance did a Tron search on Ebay, and
found
someone with a pair of UD Replicas Tron motorbike boots in my size, in
virtually new condition in and the UK. After a nervous wait I was
pleased to
win them for a very good price, and so my boot dilemma was solved.
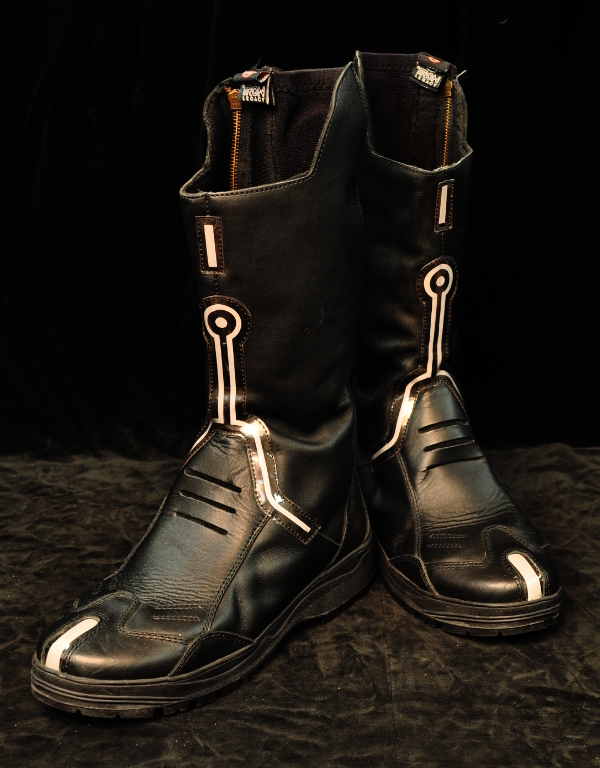
UD Replicas Boots
Helmet
I looked into making my own Sam helmet,
and probably will still
do this at some point in the future, but decided that I didn't have
either the
skills or time needed to complete it at the present time. I therefore
looked
around for a good cast from a cosplay supplier/ prop maker but
unfortunately
didn't find one so took the decision to use a Rinzler helmet instead
that RPF
member Crimson590 has produced. This has not disappointed! The cast is
excellent, the turnaround time has been really good (a couple of weeks)
and his
communication has been thorough and friendly. If you want to buy a
helmet I cannot
recommend him highly enough (e).
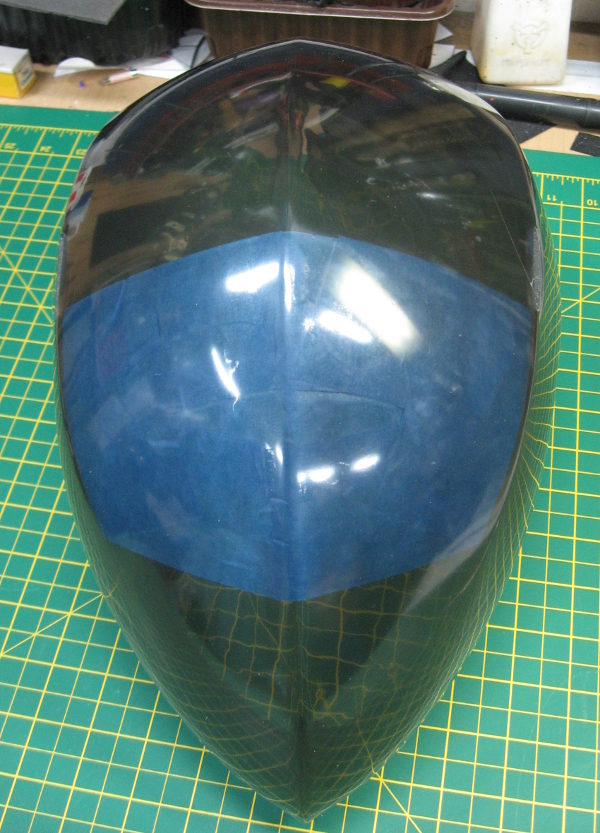
The helmet was supplied as a raw cast
which firstly required
trimming. This was done by using a cut-off disk in a rotary tool
followed by
sanding drum and finished with hand sanding. Slots for lighting were
cut out
also with a rotary tool and finished by hand. I masked the vision area
inside
the helmet and following some tips from the supplier sprayed the inside
Rustoleum
matt black. After a thorough clean the outside was protected from
overspray
with cling film, enabling the helmet to be held up to the light during
spraying
to ensure an even and opaque coating. One important thing to note- the
clear
polyurethane was very susceptible to heat and softened under the hot
water used
to clean it- luckily I noticed before any permanent distortion.
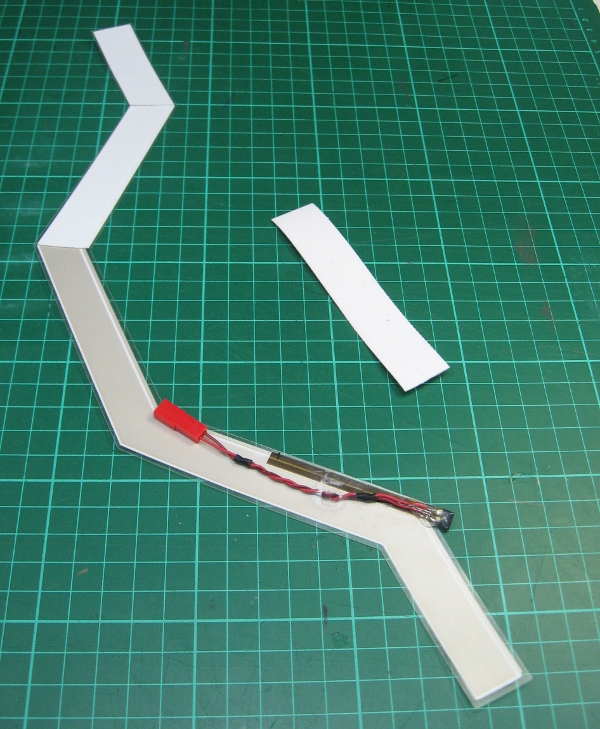
Lighting is by a length of EL wire. I planned the route out and used black heatshrink to cover the wire where light isn't needed. The wire was then fitted into the helmet with hot glue. A few pads of scrap foam, also hot glued in finished the inside off and made the helmet fit securely.

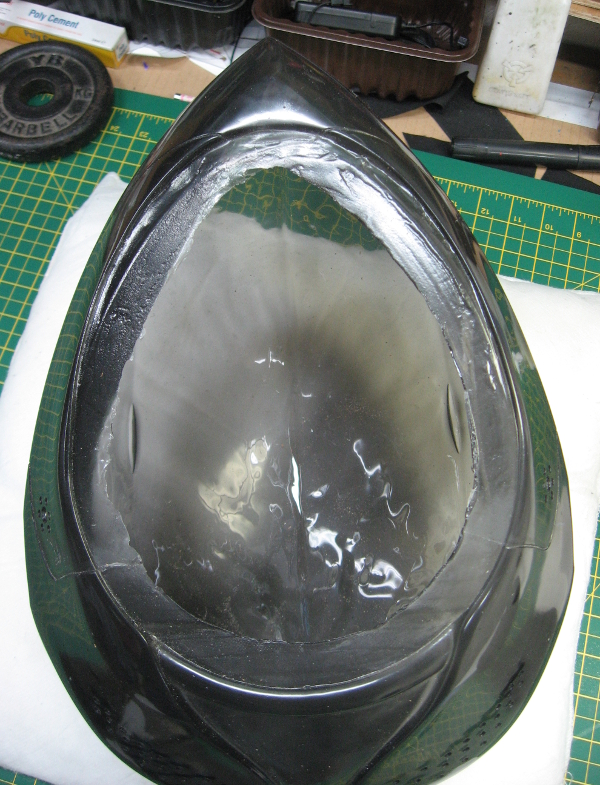
Helmet casting as received- showing where trimming was required

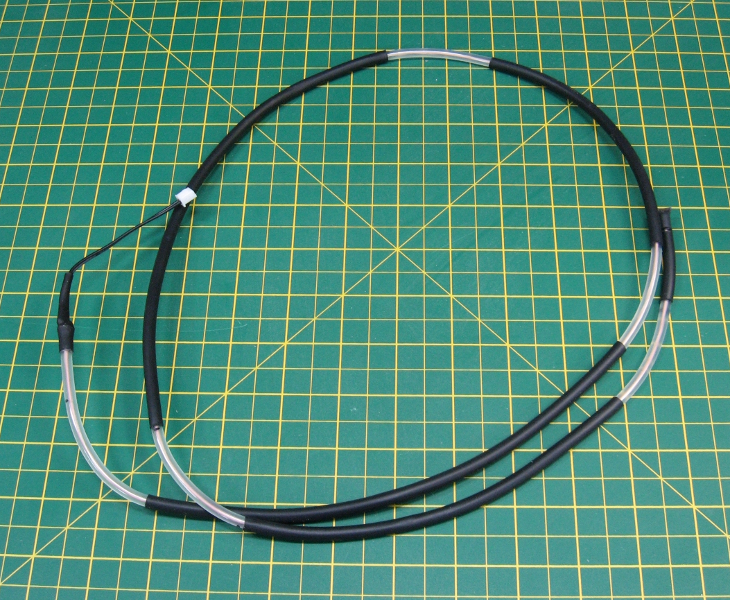
EL wire initial sizing trial and fitted with heatshrink
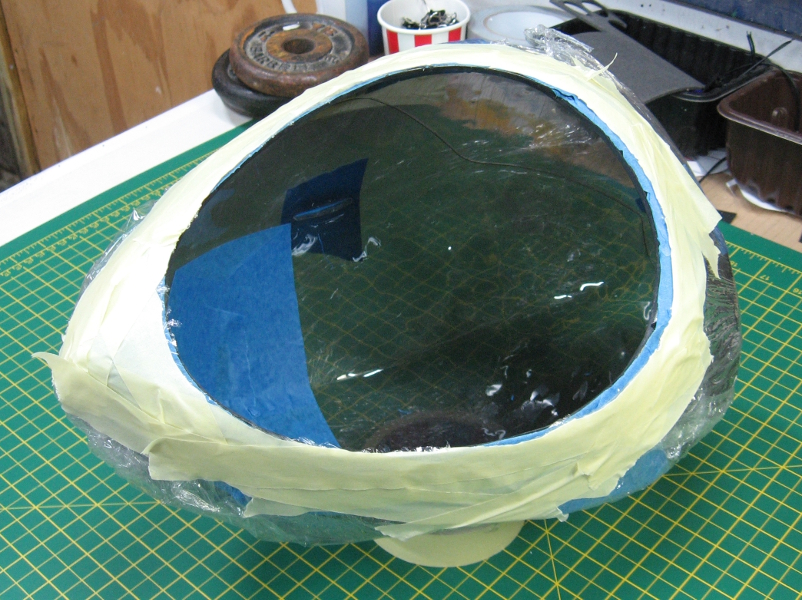
Helmet masked up ready for internal paint
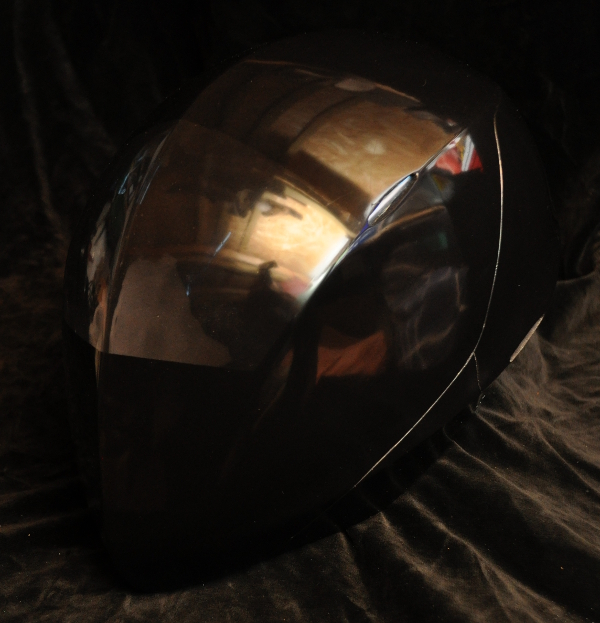
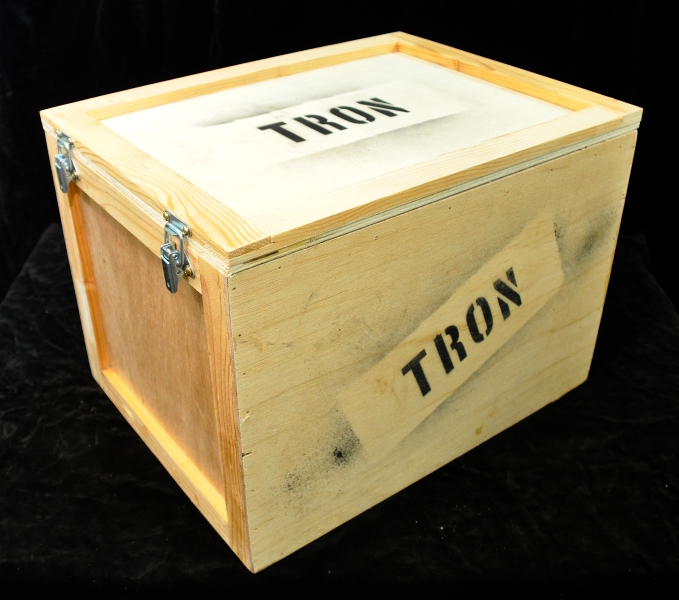
Completed Helmet & Storage Crate
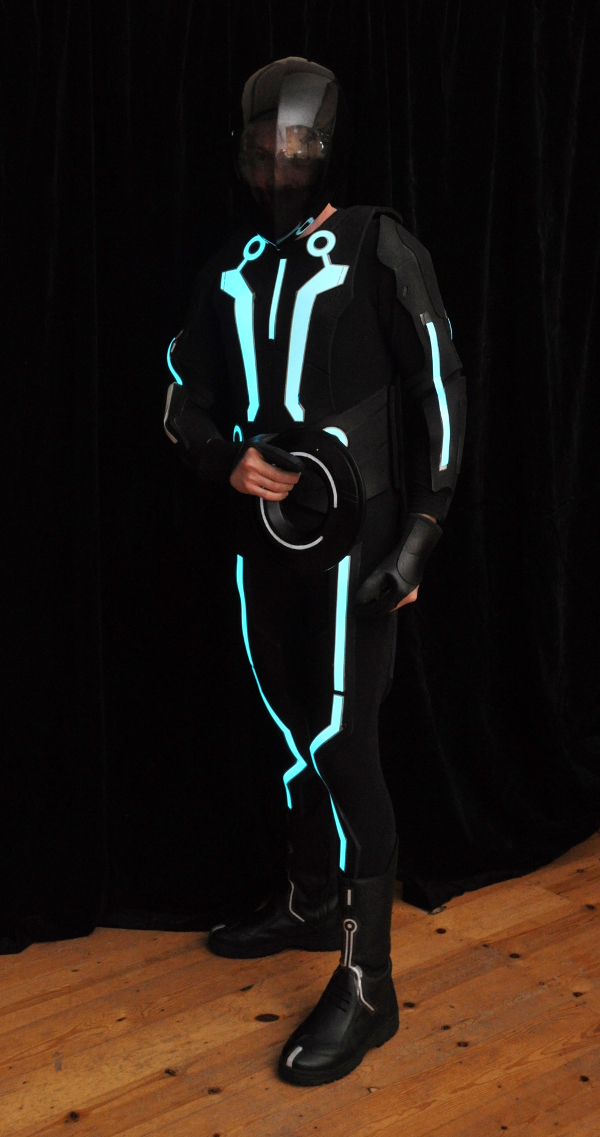
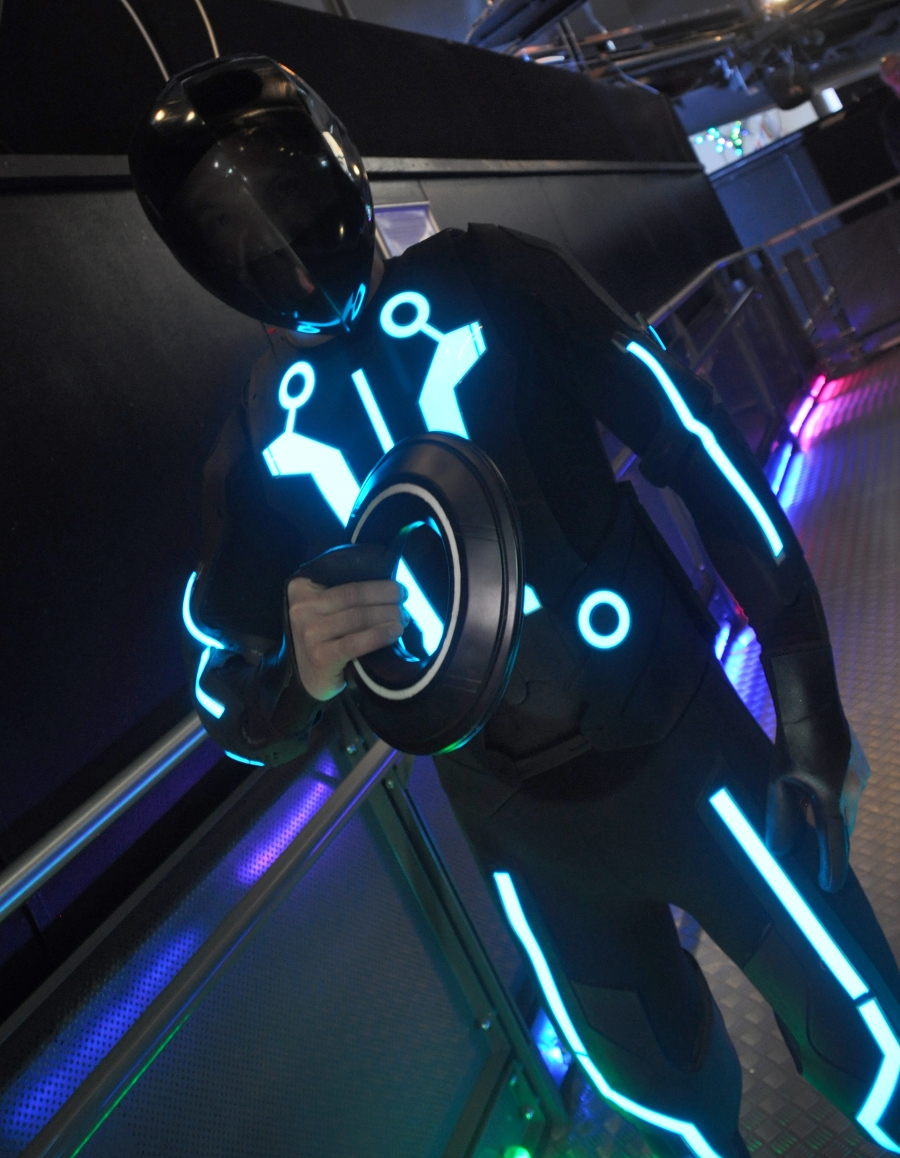
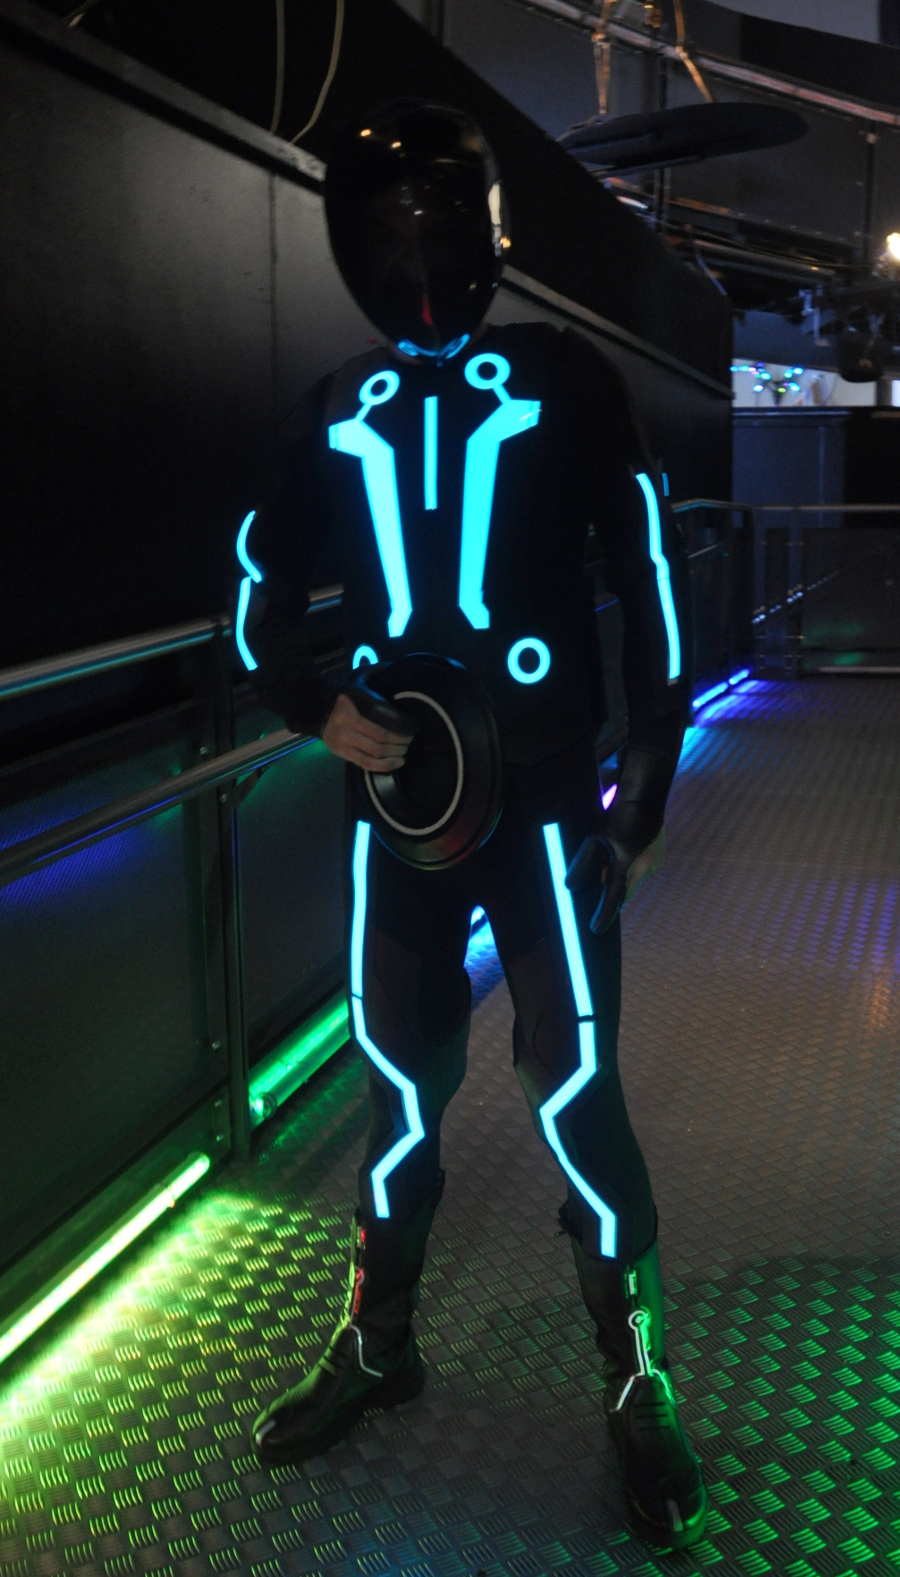
The finished costume at a party and Maker Faire UK 2018
Project Final thoughts
I was very pleased with how the costume
turned out and it has
so far been well received. The durability of most of the costume has
been good,
and the mobility whilst wearing it was reasonable. I am glad that I had
carried
out a number of trials on materials and methods before starting the
main
project and would recommend others doing the same. If I had made my
patterning
trial parts out of the same material I may have been able to get a
better fit
around the torso, although this didn't prove a significant issue.
Inverter battery life turned out well,
with it lasting about
3.5 hours with no visible dimming.
The only significant thing I would change
in the design was
how I attached the EL tape on the arms. I will now change this to more
pieces
with a split at the elbow to allow better flexibility, but could have
avoided
the problem originally.
This type of project can be very time consuming, especially
if you are trying techniques you haven't done before, like I did. My total time
investment was in the order of 150-200 hours spread across about 2 1/2 years
from first starting the disk. There are ways this could have been reduced,
particularly with familiarity with the materials and techniques, and if I
didn't have lots of other projects on the go. However, if you are starting from
scratch, you will need to devote a considerable amount of time to a costume
like this, even if you have the skills and experience.
This project was relatively expensive- the cost of the various materials, especially Plasti-dip paint and spray glue mounts up as do the electroluminescent panels- again bear this in mind before you start.
I created a fitted & padded crate from scrap material to
store the helmet and identity disk in and use a motorbike helmet cover to avoid
scratching. The main part of the costume is stored in a suitcase.
Good luck with your own version.
References
(a)
http://www.therpf.com/showthread.php?t=88230&highlight=tron
(b) Foamsmith- How to Create Foam Armor
Costumes, Bill Doran, Punished Props, ISBN 9780692388969
(c) Evil Ted Smith Channel, https://www.youtube.com/user/evilted40
(d) Costumes and Chemistry, Sylvia Moss,
Costume and Fashion Press, ISBN 0-89676-214-9
(e) http://www.therpf.com/showthread.php?t=257122&highlight=rinzler
Information & Resources
There is a fair amount of info available from people who have made costumes before, and on that used in the film, but it tends to be scattered quite widely. The replica prop forum in particular has a very comprehensive thread on the Tron Legacy film costumes, running to over 200 pages, as well as numerous individual build threads.If you have further useful links or info, I will be happy to add them to this page.
Original Sources
The Art of Tron: Legacy, Justin Springer,
Disney Editions,
Oct 2010, Hardback, ISBN 978-1423131496
Cinefex 124, http://www.cinefex.com/backissues/issue124.htm
General Articles
http://chrisoben.blogspot.co.uk/2011/04/tron-legacy-3d-canadian-cinematographer.html
http://www.popularmechanics.com/technology/digital/visual-effects/tron-legacy-lightsuit-costume-vfx
http://www.tested.com/art/movies/520562-putting-original-trons-special-effects-together/
http://hollywoodmoviecostumesandprops.blogspot.co.uk/2010/12/original-tron-legacy-movie-costumes-and.html
http://www.therpf.com/showthread.php?t=88230&highlight=tron
Reference Photos
I have gathered many reference images
together on my
Pinterest page;
http://pinterest.com/mrsuperpants/tron/
Film Suppliers
The costume budget was reportedly $13
Million, and included
at least 130 Foam latex based suits manufactured by Quantum Creations FX;
http://www.quantumcreationfx.com/
The film Helmets were manufactured by
Ironhead Studios;
The electroluminescent panels to light the
costumes are
Elastolite, manufactured by Oryon Technologies Inc, unfortunately now
bankrupt. some details:
http://uk.archello.com/en/product/elastolite
All three companies custom manufactured
parts for the film,
and will not supply individuals, although limited trial kits for the
Elastolite
are available through Sparkfun https://www.sparkfun.com/
Inverters appear to be NDL series parts
from JKL,
unfortunately no longer available.
Other Costumers
There are a number of very good write ups
on other people's
costumes around, notable ones for me are;
Quorra
http://battle-arleh.livejournal.com/3998.html
http://www.nerdsociety.com/sexy-awesome-quorra-cosplayer-tron-legacy/
Sam
http://www.instructables.com/id/Sam-Flynn-Suit-from-TRON-Legacy/
http://www.instructables.com/id/Tron-Legacy-Costume-Sam-Flynn/
Rinzler
http://s1121.beta.photobucket.com/user/FXFAN/profile/
Daft Punk
http://www.instructables.com/id/Daft-Punk-Tron-helmet-suit/
http://www.instructables.com/id/How-to-make-a-Daft-Punk-Guy-Manuel-Replica-Helmet/
http://volpinprops.blogspot.co.uk/2009/11/daft-punk-q.html
Sirens
http://thecreatorsproject.vice.com/en_uk/blog/the-perfect-tron-siren-costume
http://www.therpf.com/showthread.php?t=131753
http://annisse.deviantart.com/art/Siren-Gem-284992295
Identity
Disks
http://tektonten.blogspot.co.uk/2010/11/tron-legacy-papercraft-sams-identity.html
Suppliers
EL Tape
There are many possible suppliers of EL
tape and sheet to
manufacture the light up elements. Many of these will be selling the
same
products, manufactured in China, and so I find there is little to
differentiate
between suppliers, with the notable exceptions of EL Wire Craft in the
UK and
E-Luminates in the US. Both sell full sets and components pre-cut to
the
correct shapes.
EL Wirecraft
Electro Luminescence Inc
http://electroluminescence-inc.com/
Foam
The foam in this project is cross-linked
Polyethylene,
commonly known as XLPE. In Europe, the common brand name is Plastazote,
manufactured by Zote Foams. In the US it is available under the brand
name
Minicel, manufactured by Sekisui Voltek.
The foam is sold by density as well as
dimensions and
colour. In Europe the most widely available is Plastazote LD45, for the
US L200
is the most common. These two aren't directly comparable; Minicel L200
is most
similar in density to Plastazote LD33 and Plastazote LD45 is most
similar to
Minicel L300.
Other manufacturers produce similar XLPE
foams and these
will also be suitable for costume use if you find them. XLPE is
chemically
different to EVA foam that makes its way into a lot of costume use. EVA
is
commonly used for floor mats, camping mats and yoga mats although not
all.
Manufacturer Websites
UK Plastazote stockist
I chose to swap connectors to a JST RCY
Series connector.
These are used as these are cable mount connectors, far more compact
than those
normally used on EL wire- 4mm thick compared to nearly 9mm.
Pin
Contact
SYM-001T-P0.6 (reelled), BYM-001T-P0.6 (loose)
Socket Contact
SYF-001T-P0.6 (reeled)
Pin Housing
SYR-02TV
Socket Housing
SYP-02TV-1
Other
useful info
Font
The font used in the film is called encom, and is available only in upper case and numbers. It was available under a disney digital books page, but the link is now broken.
A good alternative is TR2N TR2N Font
Undersuit
There isn't much written about what to wear under this type
of costume. Ideally You need a method that doesn't draw attention where it's
not wanted, is comfortable and keeps smooth lines.
The first layer I use is a padded dance belt- a type of
underwear used by male dancers, available from any dancewear supplier.
Over this, at the front, I use a piece of upholstery foam
about 12mm (1/2") thick, cut to just slightly larger than the dance belt
front, tapered at the edges to give a smooth transition and held in place with
a pair of plain nylon-lycra cycling shorts. The padding needs a bit of trial
and error to get it sized correctly- mine took several attempts.
You could stop here, but I have found another layer to be
beneficial. With this costume I use a unisex nylon-lycra sleeveless catsuit,
pick a size to be tight rather than loose. This has the effect of evening out
any seams from the lower layers and smoothing out the stomach. The sleeveless
version works best with this costume as the straps are hidden by the torso, but
you could use other styles for different costumes. Unisex catsuits don't have
any additional ruching around the breast area.
Using the nylon-lycra under the cotton-lycra of the costume
makes putting the costume on much easier than would be the case if both layers
were the same material.
The colours for the base layer need to be chosen to not show
through the top layer; black or dark blue in this case works effectively, but
you may need a nude colour for a lighter costume.
I'm surprised that no-one has yet filled the niche in the
underwear market specifically for cosplay, creating a standard product that
incorporate the padding intended to smooth.
Downloads
The PDF downloads are available for use by
those wanting to
make their own costume. Use is restricted to non-commercial.
Please bear in mind that these have been based on the El Wire Craft shapes and sized for my body (I am 181 cm and 70kg) so you will need to adjust for your own needs.